Create and Manage Postsale API Keys
Connect your own systems to the Postsale API
Use Application Programming Interface (API) keys to connect your own systems to the Postsale API. Each key can use only the Shipment API and Order API permissions that you select.
This article guides you through:
- Creating a Postsale API key with the permissions your integration needs
- Enabling, disabling, editing, regenerating, reviewing, and revoking an existing API key
Before You Begin
- Visit developer.postsale.com for Postsale's API technical reference documentation
- Creating and using API Keys is a premium feature requiring a Soar billing plan. Learn more about managing your Postsale account in our Frequently Asked Questions.
Here are a few suggestions to help you get started with your Postsale API keys:
- Create a separate API key for each integration so you can assign only the permissions it needs and manage the key without affecting other integrations.
- Decide which Shipment API and Order API permissions your integration requires
- A list of the available permissions is provided for you below
- For added security:
- Grant read-only access wherever possible and avoid permissions the integration does not need
- Treat every API key like a password because the key acts on your Postsale account
- Prepare a secure password manager or secret manager where you can store the API key
- Postsale API keys are shown only once upon creation. Be sure to save your key(s) for later access if needed.
Create a New API Key
Follow the steps in this section to create a new Postsale API key.
Real-World Example
We would like to connect our internal order management system to Postsale. We would like to create an API key with only the permissions our system needs.
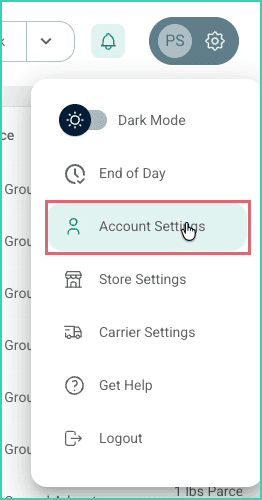
Open the Settings menu, and select Account Settings.
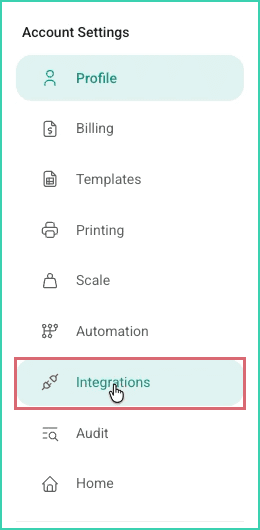
In the left-hand sidebar, select Integrations.
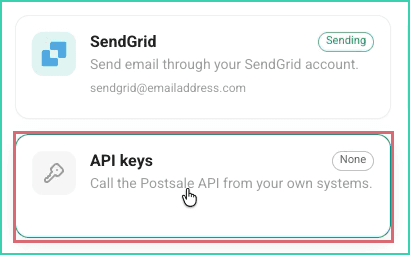
On the Integrations page, select API Keys.
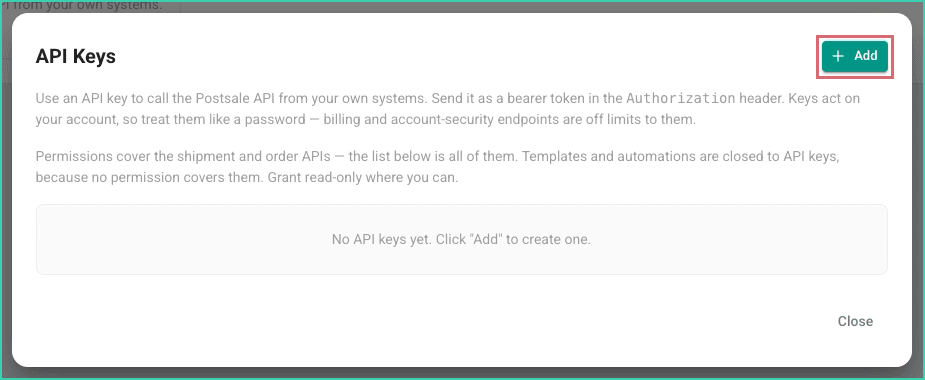
In the API Keys pop-up, select Add.
Enter a descriptive name in the Name field. We suggest naming the key after the system or purpose that will use it, so you can identify it later.

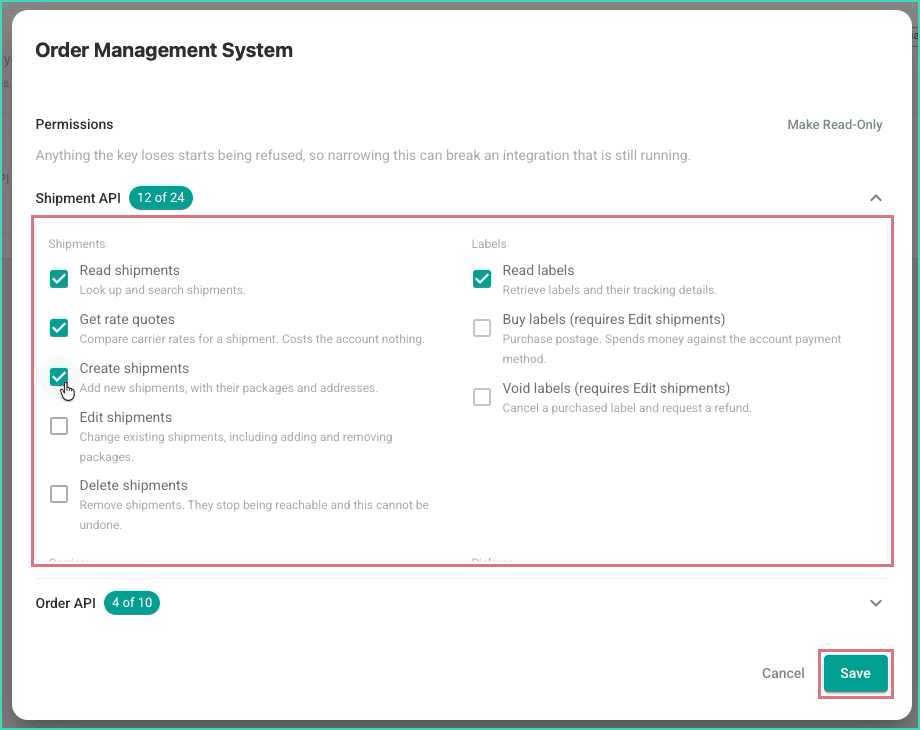
Expand each API section and select only the permissions the integration needs. A detailed list of available permissions and their descriptions is provided in the Good to Know section below.
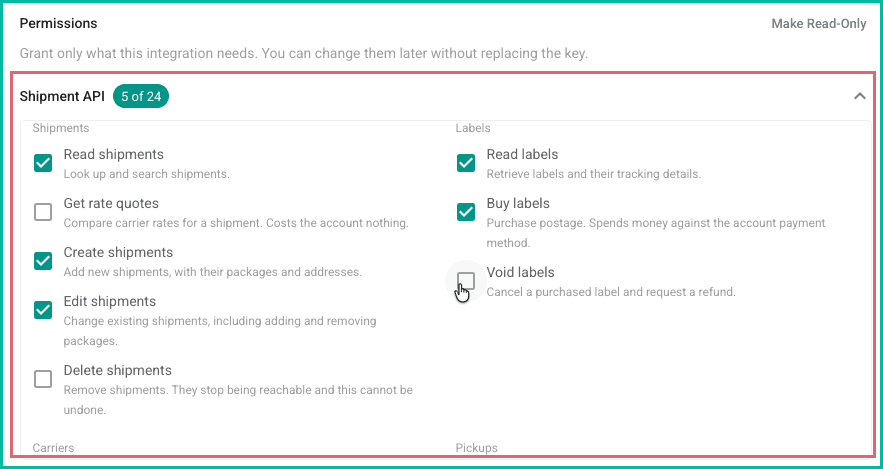
Select Make Read-Only when the integration only needs to retrieve information from Postsale. Make Read-Only selects the available read permissions and clears permissions that create, edit, delete, purchase, schedule, or otherwise change information.
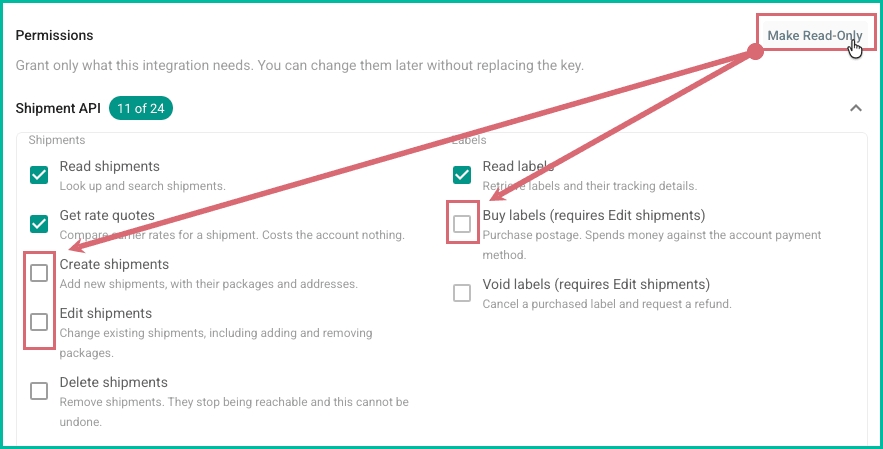
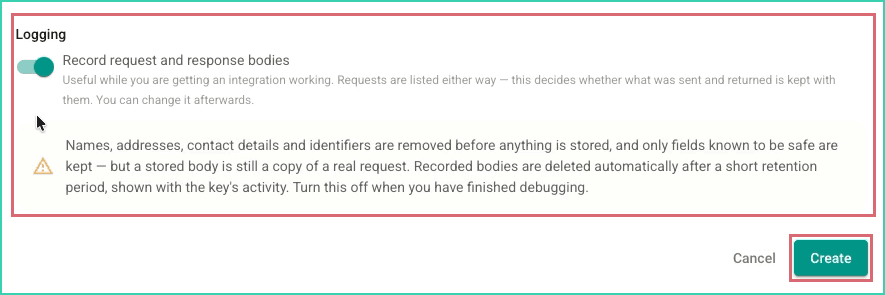
Write permissions have been automatically removed. Decide whether to enable Record request and response bodies, then click Create.
- Recording response bodies is useful when getting your integration working and for troubleshooting. Requests will be listed either way, but enabling this setting stores what was sent and what was returned in the requests.
- Postsale removes names, addresses, contact details, and identifiers before storing the body, retaining only fields known to be safe. A stored body is still a copy of a real request, so turn logging off when you finish debugging. Postsale deletes recorded bodies after a short retention period and displays them with the key's activity.
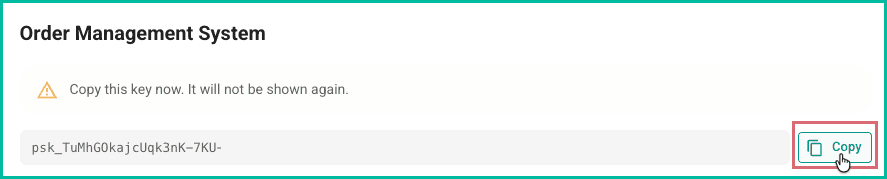
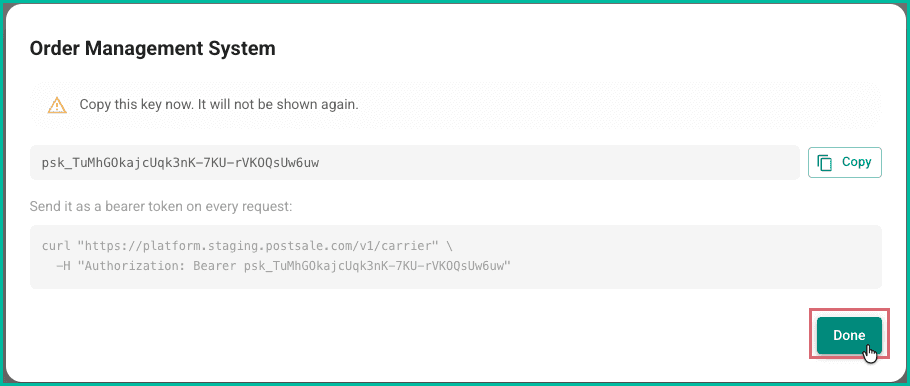
The key is created and displayed for you in the New API Key pop-up.
Click Copy to copy the API key and store the key securely.
Click Done to return to the list of API keys.
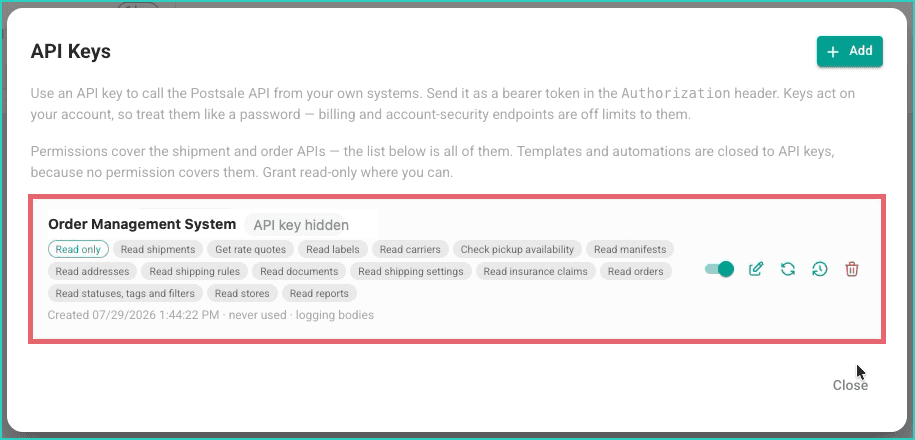
Postsale adds the key to the API Keys pop-up and displays its permissions, creation date, usage status, logging status, and management actions.
Manage Existing API Keys
Manage your API key(s) from the API Keys pop-up. You can temporarily disable a key, edit its permissions, regenerate its secret, review its activity, or revoke it.
Real-World Example
We would like to manage our Order Management System API key. We need to edit the permissions and regenerate a new key for security reasons. We'd also like to explore the other options available.
Go to Settings > Account Settings > Integrations, select API Keys, and locate the key you wish to manage. Each key includes an Enabled toggle and the following actions:
- Enable or disable the API key
- Edit Permissions
- Regenerate
- View Activity
- Revoke the API key

Use the Enable/Disable toggle to disable or enable the key. A disabled key remains in Postsale but refuses API requests until you enable it again.

Select Edit Permissions to update the Shipment API and Order API permissions. Click Save.
- You can change permissions without replacing the key.
- Removing a permission causes Postsale to refuse requests that need that permission and may break a running integration.

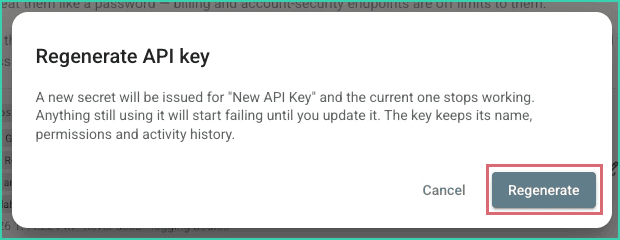
Select Regenerate to generate a new API Key. Review the confirmation, and select Regenerate again. Be sure to copy and save the new API Key in a secure location for future reference.

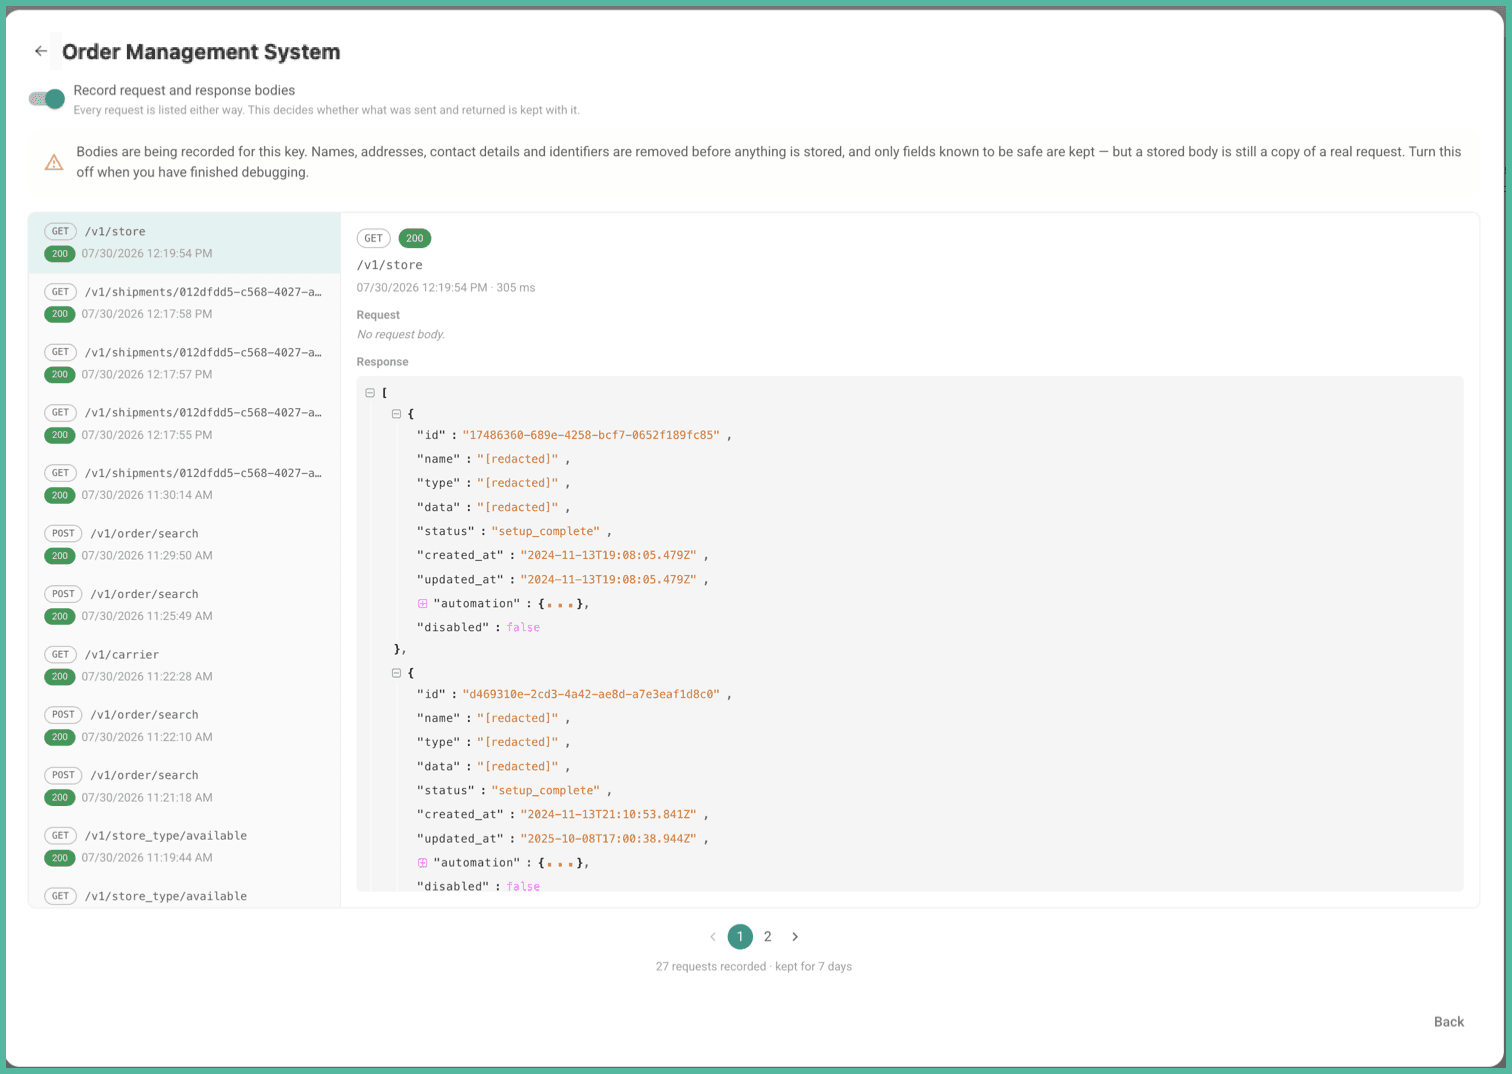
Select Activity to review the key's requests and request or response bodies retained for debugging.
- The activity screen lists every request. Use the Record request and response bodies toggle to control whether Postsale retains the sent and returned bodies with each request.

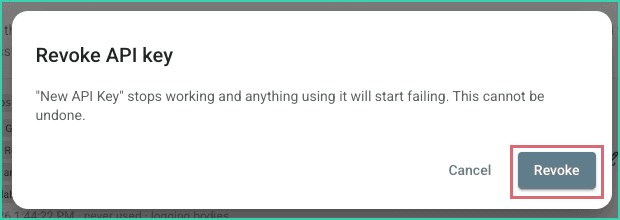
Select Revoke to permanently remove the API key. Review the confirmation, and select Revoke again.

Good To Know
- Send an API key as a bearer token in the Authorization header
- API keys cannot access billing or account-security endpoints
- API keys cannot access templates or automations
- The API Keys pop-up shows each key's selected permissions, creation date, usage status, and logging status
- Disable a key when you need a reversible pause, and revoke it only when you wish to remove its access permanently
Available Permissions
Select the appropriate tab to view a list of available permissions and their descriptions.
Shipments
- Read Shipments: Look up and search shipments.
- Get Rate Quotes: Compare carrier rates for a shipment. Costs the account nothing.
- Create Shipments: Add new shipments, with their packages and addresses.
- Edit Shipments: Change existing shipments, including adding and removing packages.
- Delete Shipments: Remove shipments. They stop being reachable, and this cannot be undone.
Labels
- Read Labels: Retrieve labels and their tracking details.
- Buy Labels: Purchase postage. Spends money against the account payment method.
- Void Labels: Cancel a purchased label and request a refund.
Carriers
- Read Carriers: See connected carrier accounts, their settings, and carrier drop-off locations.
- Manage Carriers: Connect, edit, and disconnect carrier accounts. Disconnecting one stops every future shipment on it.
Pickups
- Check Pickup Availability: Ask a carrier when it could collect. Currently FedEx only.
- Schedule Pickups: Book a carrier collection. This sends a courier to the address.
- Cancel Pickups: Cancel a booked collection.
Manifests
- Read Manifests: See end-of-day manifests and which shipments are eligible for one.
- Create Manifests: Close out the day by submitting a manifest to the carrier.
Addresses
- Read Addresses: See saved ship-from addresses, and look up or autocomplete an address.
- Manage Addresses: Add, edit, and remove ship-from addresses.
Shipping Rules
- Read Shipping Rules: See the rules that pick a service and packaging, and what they would do for a shipment.
- Manage Shipping Rules: Create, edit, and delete shipping rules.
Documents
- Read Documents: Retrieve customs paperwork and commercial invoices attached to a shipment.
- Manage Documents: Upload, replace, and remove customs documents.
Shipping Settings
- Read Shipping Settings: See account-level shipping settings.
- Manage Shipping Settings: Change account-level shipping settings.
Insurance
- Read Insurance Claims: See claims filed against a shipment.
Still have a question? Ask a person.
Write to support@postsale.com or send us a message. We reply the same business day, Monday to Friday, 8 AM to 5 PM Central.