Advanced Editing Postsale Templates
A more in-depth look at editing templates
From what you print to what you email, Postsale's templating system helps you customize the entire workflow experience. Whether it’s pick lists, packing slips, invoices, or email notifications, you can tailor each template to fit your brand and workflow. In this guide, we’ll show you how to safely and confidently edit your templates using Liquid, the language behind Postsale's dynamic content.
What are Postsale templates?
You are probably familiar with the term ‘templates’. Templates give you a formatted starting point so you don't have to build documents from scratch. Templates are great because they give you a starting point when creating documents, so you don't have to do the bulk of the design and formatting work. The same concept is available in Postsale.
Postsale includes templates for viewing and printing packing slips and invoices, sending emails, printing shipping labels, and more. You can use these templates as is or edit them to include the information you need. You can brand your templates with a logo, a company slogan, custom messages for your customers, and more.
The Template Editor
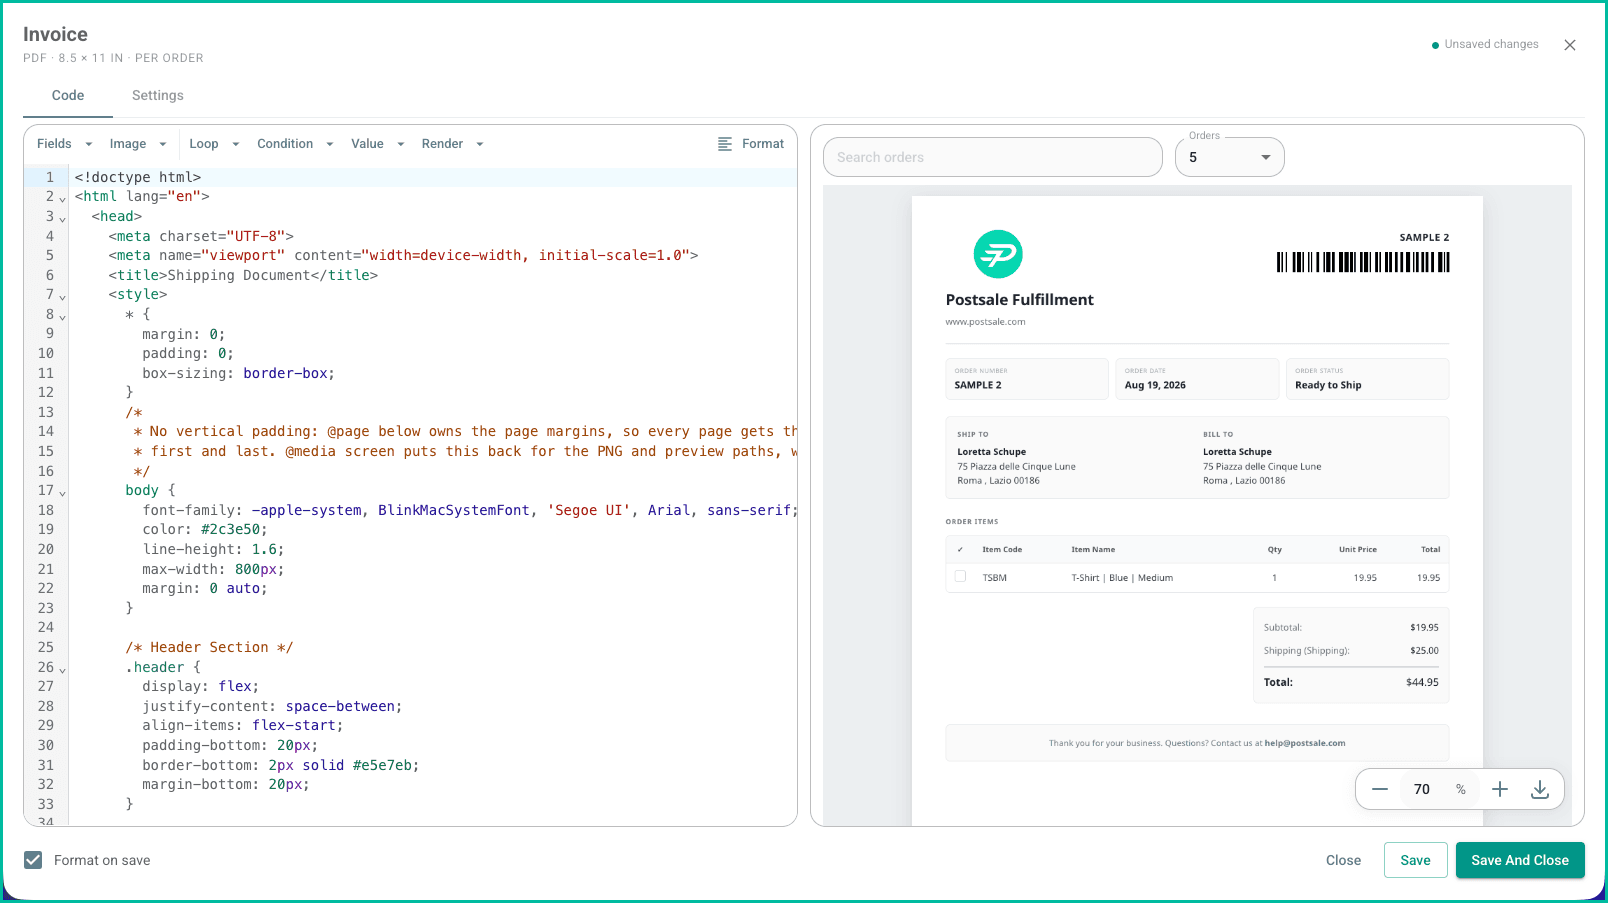
Postsale templates use a combination of Cascading Style Sheets (CSS) and Hypertext Markup Language (HTML) to format the look and layout. It also includes the ability to use the Liquid template language to access and include Postsale data in HTML formatting.
The Postsale template editor provides complete control over your templates. The template editor can be used to customize existing Postsale templates, create new ones from scratch, and you can even copy and paste templates that you have created and use in other software or online marketplaces.
This article covers how Liquid works and how to use it in your Postsale templates.
About Liquid
The good news is that the Liquid template language is widely used, and you may already be familiar with it. For those of you who are new to it, this article will help you get a basic understanding of how to use Liquid in your Postsale templates.
Think of the Liquid template language as a way to retrieve information from Postsale and include it in a template when viewing or printing. For example, instead of having to type in a customer's Ship To address every time you want to print a packing slip, you can include Liquid variables that tell the template, “Hey template. When I view you or print you, please grab the customer's Ship To address from Postsale for me.”
To put it another way, instead of manually typing an actual address every time you print a packing slip, like this…
<td>
  John Doe

  12345 Street Ave.

  Suite 1000

  St. Louis, MO 12345
</td>
…you include the Liquid variables in the template to tell it to grab the information from Postsale and add it to the printed packing slip for us, like this:
<td>
  {{ order.ship_address.name }}

  {{ order.ship_address.company }}

  {{ order.ship_address.street_line_1 }}

  {{ order.ship_address.street_line_2 }}

  {{ order.ship_address.city }},
  {{ order.ship_address.state }}
  {{ order.ship_address.postal_code }}

</td>
Now, no matter what order you print the packing slip for, the correct address will be included because Postsale knows which data to retrieve and how to display it based on the Liquid variables you include in the template. The correct address appears every time, regardless of which order you print.
Liquid Autocomplete
The great thing is you don't have to remember all of the available variables or go hunting through a reference sheet. Just start typing in the Postsale template editor, and autocomplete will help you find what you're looking for.
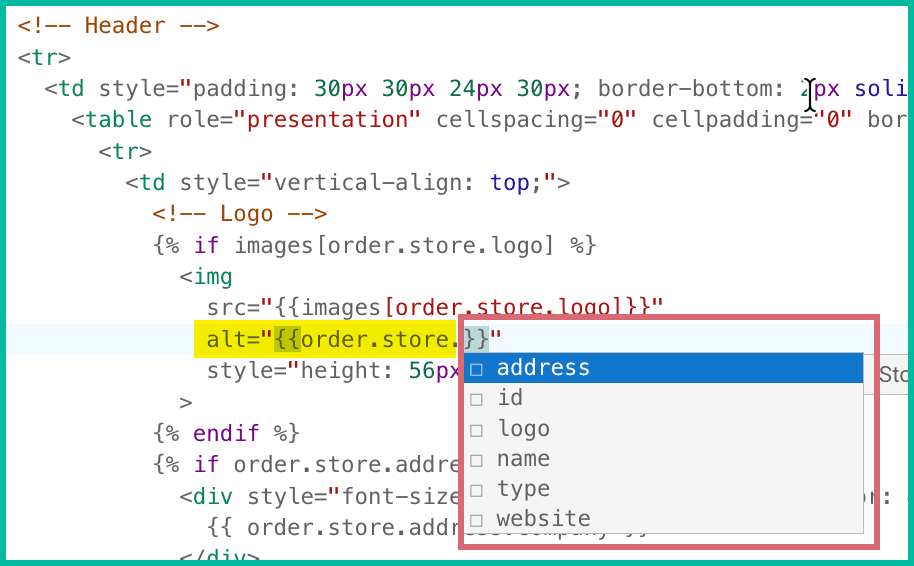
Let's look more closely at how Liquid is used in Postsale templates.
Liquid's Delimiters
There are two sets of delimiters used to include Liquid within HTML. Think of these delimiters as placeholders that tell Postsale, “Hey, Postsale, replace this code with the correct data when the template is printed or viewed.”
- {{ }} - The double curly braces denote output. ‘Output’ is just a way of telling the template to replace the Liquid variable with the correct information when the template is viewed or printed. For example, {{ order.ship_address.street_line_1}} might output 12345 Street Ave. on a printed packing list.
- {% %} - The double curly braces denote Logic. ‘Logic’ tells the template to perform some sort of logical action. For example, logic can be used to perform a Loop to iterate over the same output as many times as needed, or to execute an if/else/endif statement. More on both of those in a moment.
Liquid Output
As stated above, you use the {{ }} double curly brackets to output a piece of data from Postsale when viewing or printing the template. Here's an example:
{{order.number}}When viewed or printed, this would output the order number, like this:
DS1459As a real-world example, perhaps you add a custom message to the bottom of your packing slips:
Thank you for your order# {{order.number}}.Which would output…
Thank you for your order# DS1459.Object.Properties
Next, let's take a look at the Liquid dot syntax. The syntax tells us how to write Liquid properly so that your templates understand it. We'll use the order.number example from above to demonstrate proper Liquid dot syntax.
The first part, order, is the object. The order variable contains all data related to order information in Postsale. After the . are the properties of the order object. The property can be a single item, like an order number, as in your order.number example. A property may also be a list of items, such as all of the products on a customer's order.
Here are a few examples:
- order.number
- order.status
- order.requested_shipping
- order.ship_address_name
- order.items
- order.charges
Collections
Properties that are plural represent Liquid Collections. Instead of returning a single piece of information, they can be used to grab a whole list of information, called an array. For example, order.items would retrieve the entire list of items for an order. Then, you can look at each, individual item within the Collection to grab specific properties that are associated with it, such as:
- item.name - An item's description
- item.quantity - The quantity of the item on the order
- item.sku - The item's SKU number
When dealing with Collections, you use a Liquid Loop to access individual properties.
Loops
A Liquid Loop outputs the information you need from the same piece of code multiple times. For example, you may wish to include the item name and item quantity sold for each product on an order. So, by using a loop, you tell the template to repeat the output for each item in the order. Using the order.items Collection, the loop would look like this:
{% for item in order.items %}
       <td style='text-align: left;'>{{ item.name }}</td>
       <td style='text-align: right;'>{{ item.quantity }}</td>
{% endfor %}
The loop repeats for each item on the order. So, if there are 10 items, the loop will repeat 10 times.
The first line of the loop uses the {% %} delimiter to denote logic and designates a variable that represents item within the loop.
{% for item in order.items %}Notice that, in addition to Liquid, HTML is used within the loop to format the data in the template. In this case, the output for item.name and item.quantity is left-aligned within a table cell.
       <td style='text-align: left;'>{{ item.name }}</td>
       <td style='text-align: left;'>{{ item.quantity }}</td>
Lastly, you need to break the loop so the template continues after all loops are completed.
{% endfor %}Filters
Now add a filter to the loop from the previous section. Filters let you manipulate data and reduce the amount of code you need to write.
In addition to the item name and item quantity, perhaps you would also like to include the item price in the loop. Using a filter, you can output the data formatted as currency with the money filter.
To use a filter, you add the pipe | character followed by the filter. Here's an example:
<td style='text-align: right;'>{{ item.price | money }}</td>In this case, the item name will be left-aligned, the item quantity will be left-aligned, and the item price will be right-aligned within a table cell and formatted as currency. So, now your completed loop looks like this:
{% for item in order.items %}
       <td style='text-align: left;'>{{ item.name }}</td>
       <td style='text-align: right;'>{{ item.quantity }}</td>
       <td style='text-align: right;'>{{ item.price | money }}</td>
{% endfor %}
Logic
Liquid logic allows us to control the output of your Liquid file to make decisions on exactly what information is displayed. Here is where those logic delimiters {% %} come into play. Let's look at an example that uses a When statement to say:
“Look at the charge type. When it is ‘discount’, output the value as a monetary amount and add a minus sign. When the charge type is ‘tax’ or ‘shipping’, output as money without the minus sign.”
{% for charge in order.charges %}
    {% case charge.type %}
        {% when 'discount' %}
            -{{charge.amount | money}}
        {% when 'tax', 'shipping' %}
            {{charge.amount | money}}
    {% endcase %}
{% endfor %}
Here's another example using an if/else/endif statement to say:
"Look at the ship address country code. If it is ‘US’ output ‘Domestic’, if it is ‘CA’ output ‘Canada’, and if it is anything else, output ‘International’.
{% if order.ship_address.country_code == "US" %}
  Domestic
{% elsif order.ship_address.country_code == "CA"  %}
  Canada
{% else %}
  International
{% endif %}
Operators
We can also use comparison operators (greater than, less than, equals, etc.). Here's an example using the > greater than operator to say:
"If the order's charge amount is greater than $100, display a message that gives the customer a 15 percent discount code for their next order. Otherwise, display a message giving the customer a 5 percent discount code for orders of $25 or more.
{% for charge in order.charges %}
    {% if charge.amount > 100 %}
 Thank you for your order. Use discount code SAVE15 to save 15 percent off of your next order.
{% else %}
 Thank you for your order. Use discount code SAVE5 to save 5 percent off of your next order of $25.00 or more.
  {% endif %}
{% endfor %}
Here are some of the available comparison operators you can use:
==equal to!=not equal to- > greater than
<less than- >= bigger or equal
- <= less or equal
Summary
If Liquid is new to you, this article gives you enough to start customizing templates. Postsale's built-in templates and autocomplete handle the rest. Postsale includes templates for you as a starting point, and each template includes HTML formatting and sections that use Liquid to output information.
Check out our Personalize Your Templates help article for some step-by-step examples of edits you can make to brand your templates.
Helpful Resources
On this page
Related